Short answer: every GoHighLevel workflow has three parts: a trigger that starts it, actions that run in order, and settings that set the rules. In this tutorial I build one real new lead follow up from a blank page. It assigns the lead, sends an email and a text, waits a day for a reply, and if there's no reply it creates three numbered call tasks for your team. Along the way you'll use trigger filters, If/Else, a goal event, the new Loop and Router actions, Workflow AI and the execution logs.
How this was tested: everything here is a real screen in my own test account, using demo contacts only, with do not disturb switched on for every channel. Nothing reached a real person, and the workflow stays a draft the whole way through. Loop showed a Beta tag in my account. HighLevel changes menus often, so a label or two may look a little different in yours.
Key moments in the video
- 00:00 What you'll build
- 01:06 How every workflow works
- 02:06 Create a workflow
- 02:53 Triggers and filters
- 04:06 Assign, tag and send an email
- 05:09 Send a text with Write with AI
- 06:02 Wait for a reply
- 06:53 If/Else
- 08:09 Workflow settings
- 09:03 Goal events
- 10:03 Loop: repeat steps
- 10:59 Router: run every branch that matches
- 11:50 Build by chat with Workflow AI
- 12:33 Test your workflow and read the logs
- 14:17 Recap and a checklist before you publish
If you'd rather watch, the full build is in the video above. New GoHighLevel tutorials go up on my Code With Urooj YouTube channel. If you can, open your own account in another tab and build it with me.
What you'll build
A new lead comes in. They get a friendly email and a text, and they're handed to someone on your team straight away. Then the workflow waits for them to reply. If they reply, it stops chasing. If they don't, your team gets three numbered call tasks, and a note on what to try first.
The example is a small home services business, like a plumber or a cleaner. A new enquiry comes in, and the owner wants a quick reply and a reminder to call. We start with the basics, triggers and actions, and finish with the advanced parts: If/Else, goals, Loop, Router and Workflow AI.
How every workflow works
Before you click anything, here's the one idea that makes every workflow make sense. Every workflow has three parts:
| Part | What it is | Examples |
|---|---|---|
| Trigger | What starts the workflow | A form is filled in, a tag is added, a lead replies |
| Actions | What happens next, in order | Send an email, create a task, wait a day |
| Settings | The rules around it | Whether someone can go through twice, who your messages come from |
In plain words: when this happens, do these things, in this order, under these rules. Remember that sentence and you can read any workflow. HighLevel's own getting started with workflows guide covers the same building blocks if you want the official version.
Before you start: a safe test setup
My demo contacts have do not disturb switched on for every channel. So even when a step tries to send something, nothing reaches a real person. Please set yours up the same way before you test, or test only on your own contact details.
Step 1: Create the workflow
- Go to Automation, then Workflows.
- Click Create Workflow, then Start from Scratch.
- Give it a name you'll still recognise later. Mine is WF101 New lead follow up.
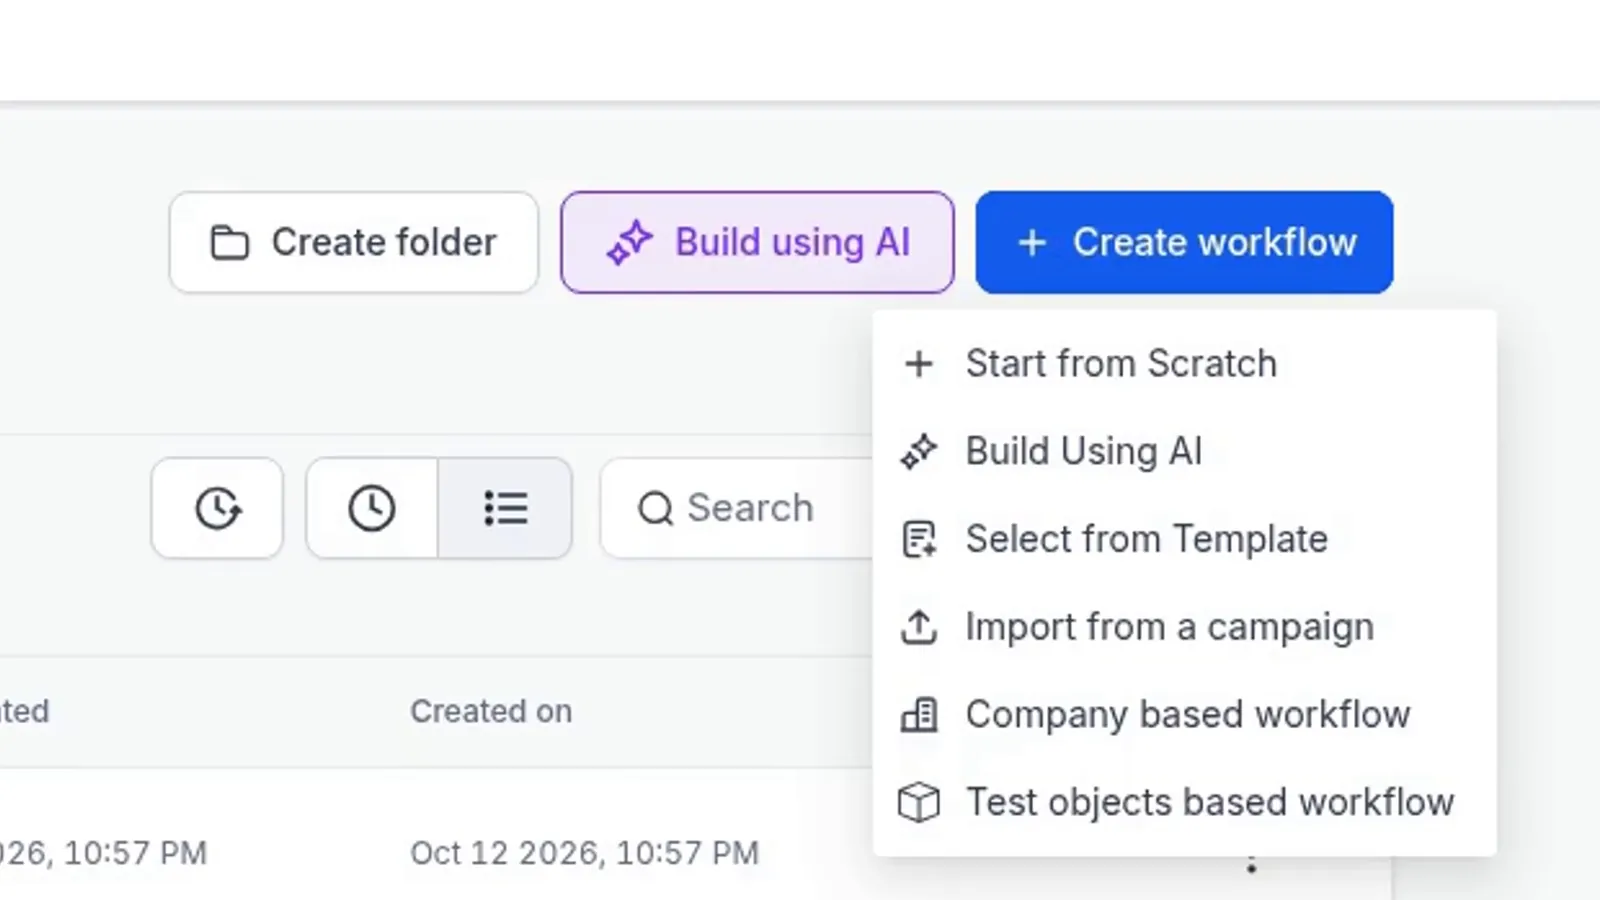
You'll see Build using AI and templates in that menu too. They're handy, but build from scratch once and you'll understand what they build for you.
Now look along the top of the builder:
- Builder is where you add the steps.
- Settings holds the rules.
- Enrollment history shows who went in.
- Execution logs show every step that ran, for every contact. That last one is your best friend when something goes wrong.
See where it says Draft? A draft doesn't run for anyone until you publish it, so you can't break anything here. Mine stays a draft the whole way through.
Step 2: Add a trigger with a filter
Click Add New Trigger. Yes, the list is long. Don't try to learn it all today. It's grouped into sections like contact, events and opportunities, and there's a search box at the top. A few you'll use a lot are Form Submitted, Customer Replied and Contact Tag.
I'm using Contact Tag, because it's the easiest one to control. It fires when a tag is added or removed, and almost anything can add a tag: a form, another workflow, an integration, or you, by hand. You can give the trigger its own name too, which helps once you've got a few. Mine is New lead tag added.
The filter is the most important part
- Click Add filters and pick Tag added.
- Choose the exact tag. Mine is
wf101-new-lead. - Click Save trigger.
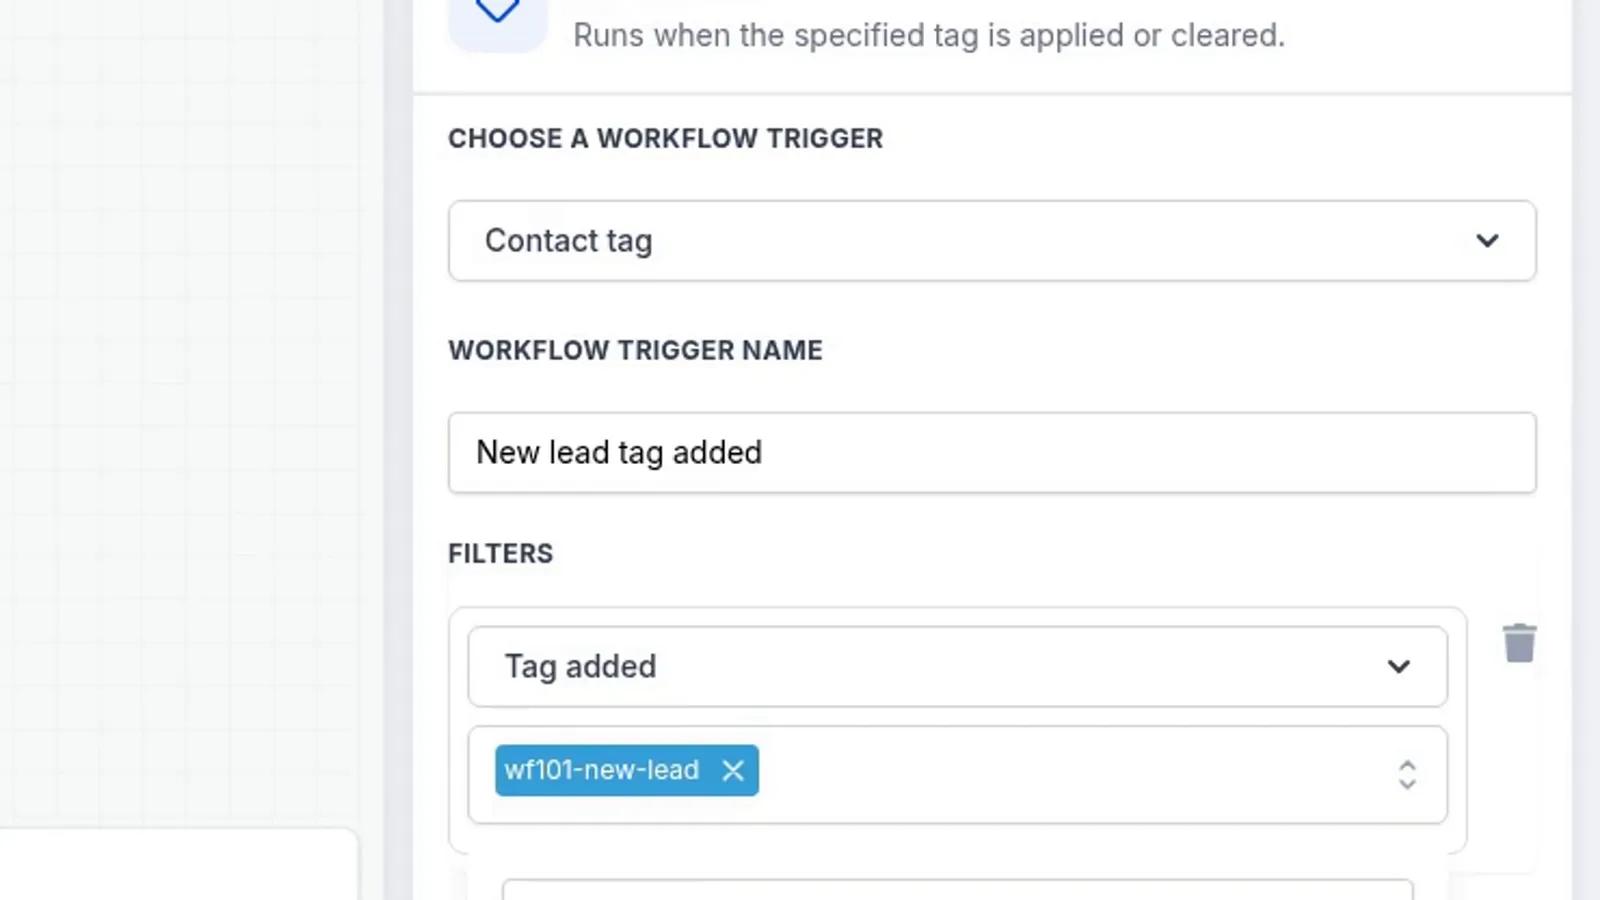
Why the filter matters: without a filter, this trigger fires for every tag added to every contact in your account. It's one of the most common beginner mistakes, and it's easy to miss, because the workflow still looks fine. Pick a tag that nothing else uses, so nothing can start this workflow by accident.
You can add more than one trigger, and any of them will start the workflow. I'm keeping just the one.
Step 3: Assign, tag and send an email
Now the actions. Click the plus under the trigger. The list is grouped again, so search is the quickest way in.
- Assign to user. Pick the team member who should own new leads. I use a test team member. There's also an option to only apply this to contacts who don't have an owner yet. Why start here? Because a lead with no owner is a lead nobody calls.
- Add Contact Tag:
wf101-contacted. Tags let you see where someone is at a glance. Later you can filter your contacts by this tag, or use it to start another workflow. - Send Email. Search for email and pick Send Email.
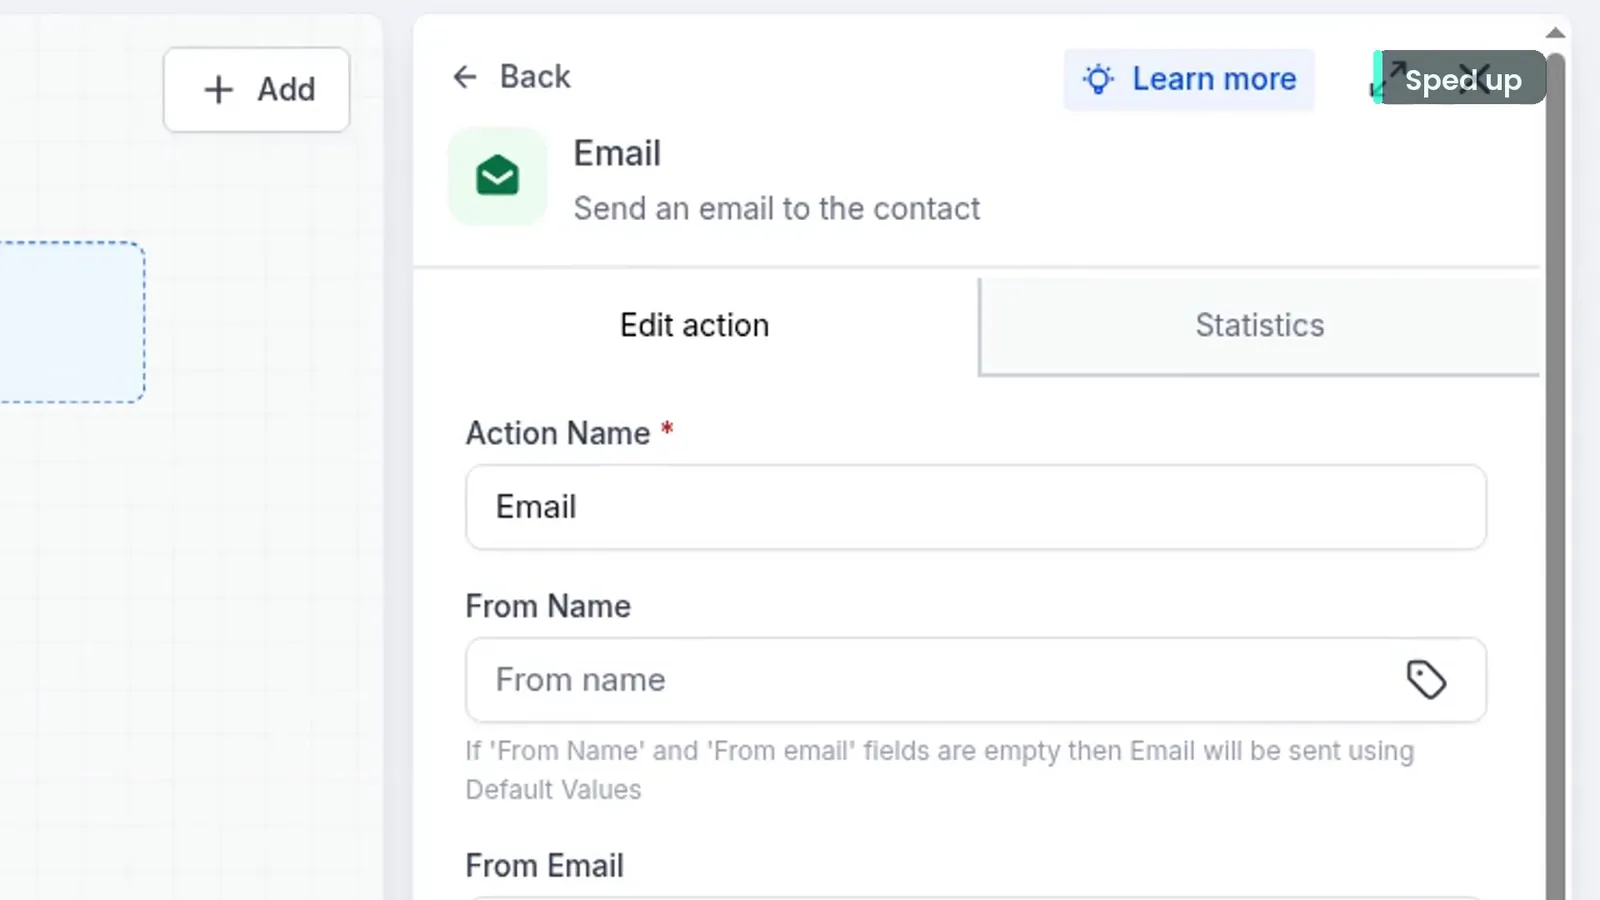
For the email:
- I leave the From Name and From Email empty, so GoHighLevel uses the account's default sender.
- Subject line: short and human. Mine is Thanks for getting in touch.
- In the body, click the custom values button and add First Name, so every email greets the person by their own name.
- Keep it short. Say thanks, and tell them what happens next. That's all a first email needs to do.
Then click Save action.
Step 4: Send a text with Write with AI
Click the plus and pick Send SMS. There's a Write with AI option here. You describe the message in plain words, then click Generate SMS. My prompt was:
A friendly short text thanking a new lead for getting in touch and asking a good time to call.
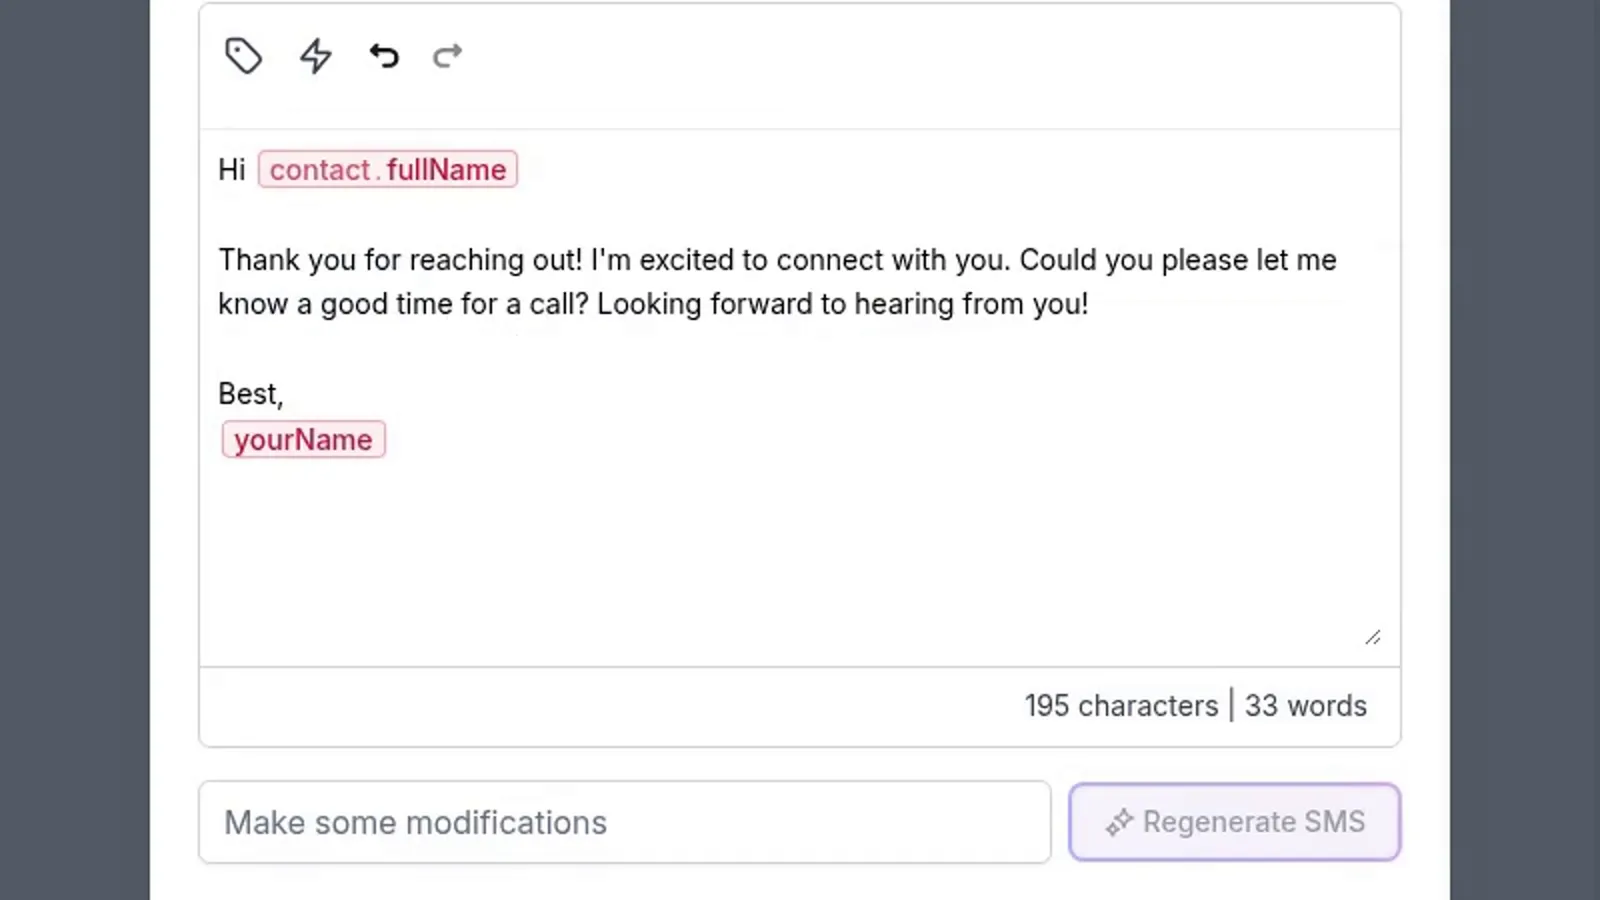
The draft thanks them and asks when would be a good time for a call. Not bad. But read it before you use it. It's longer than I'd like for a text, and it signs off with a your name placeholder. Save that without reading, and every lead gets a text signed "your name".
So I clear it and write my own: First Name from custom values, then thanks for getting in touch! When is a good time for a quick call? Short texts are easier to reply to. AI is great for a first draft, but you're the one who signs it off. Save the action.
Step 5: Wait for a reply
Now give the lead time to reply. Click the plus and pick Wait. There are a few kinds, including a set amount of time, until the contact replies, and until a recurring window opens. HighLevel's Wait action help article lists them all.
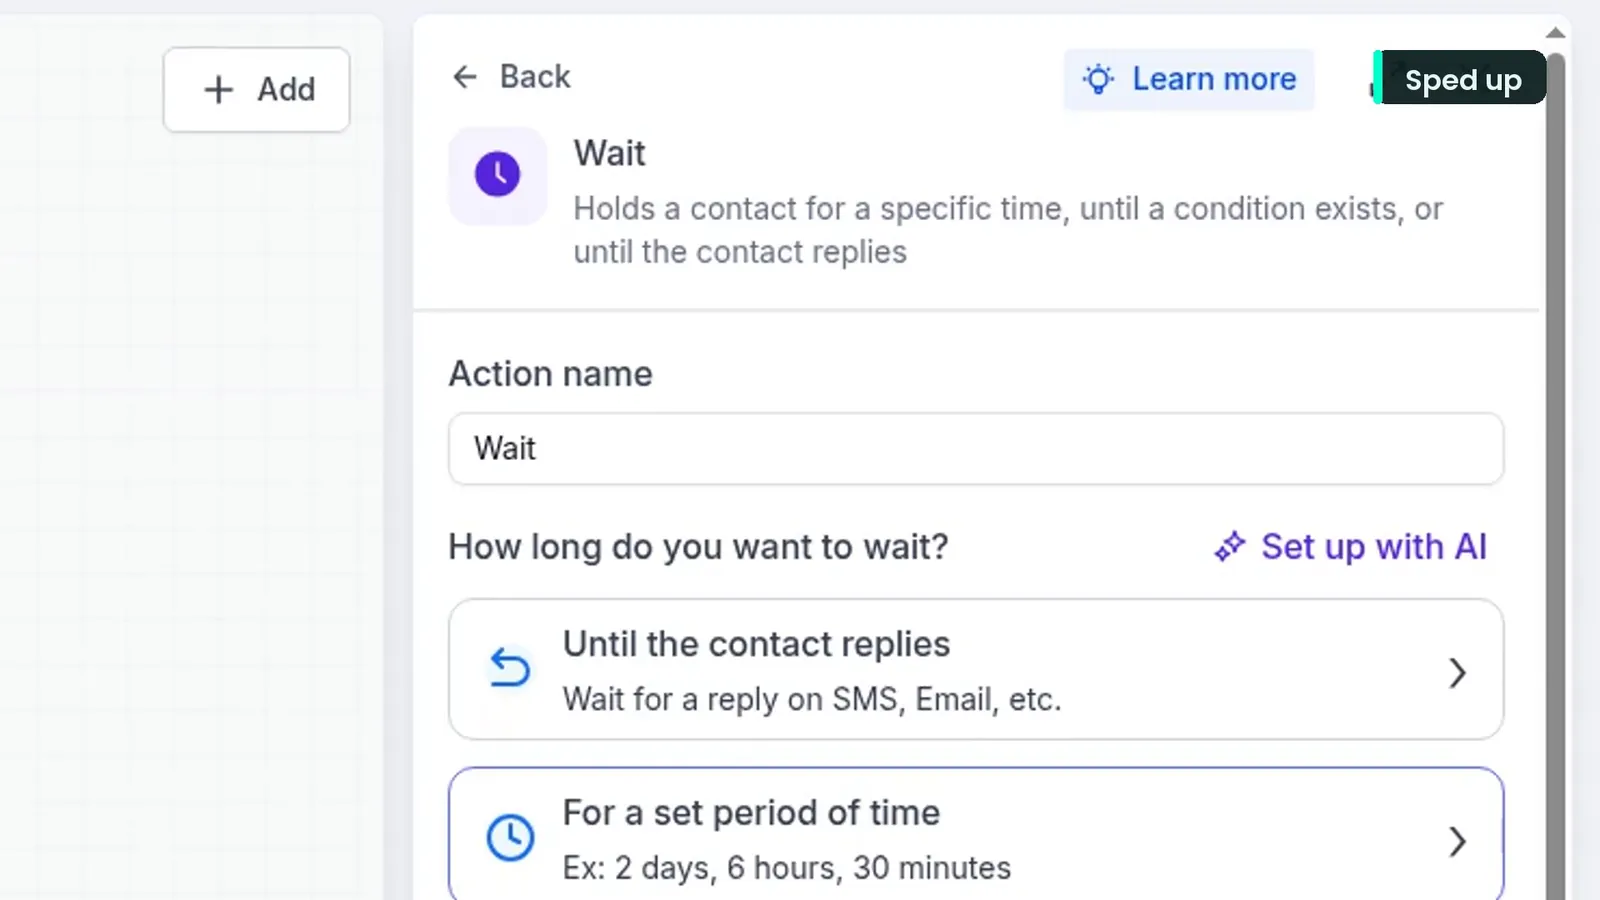
- Pick until the contact replies, because you don't want to chase someone who's already answered.
- Choose what it's listening for. I pick email and SMS.
- Set the timeout to one day.
Now watch the canvas. It splits into two paths: Contact reply, for when they answer, and Time out, for when the day runs out and they haven't. That split is what makes a follow up feel polite instead of pushy.
On the contact reply path, I add the tag wf101-replied and a note that just says Replied. Then that path ends. They answered, so we stop. Everything from here on sits on the time out path.
Quick check in. So far you've got a trigger, an owner, a tag, an email, a text and a wait. That's the beginner half done.
Step 6: If/Else and an internal notification
On the time out path, you want different steps depending on what you know about the lead. That's what If/Else is for.
- Click the plus and pick If/Else. You can start from a scenario recipe, or build your own. I build my own and name the branch Has phone.
- Add a condition: Phone, is not empty.
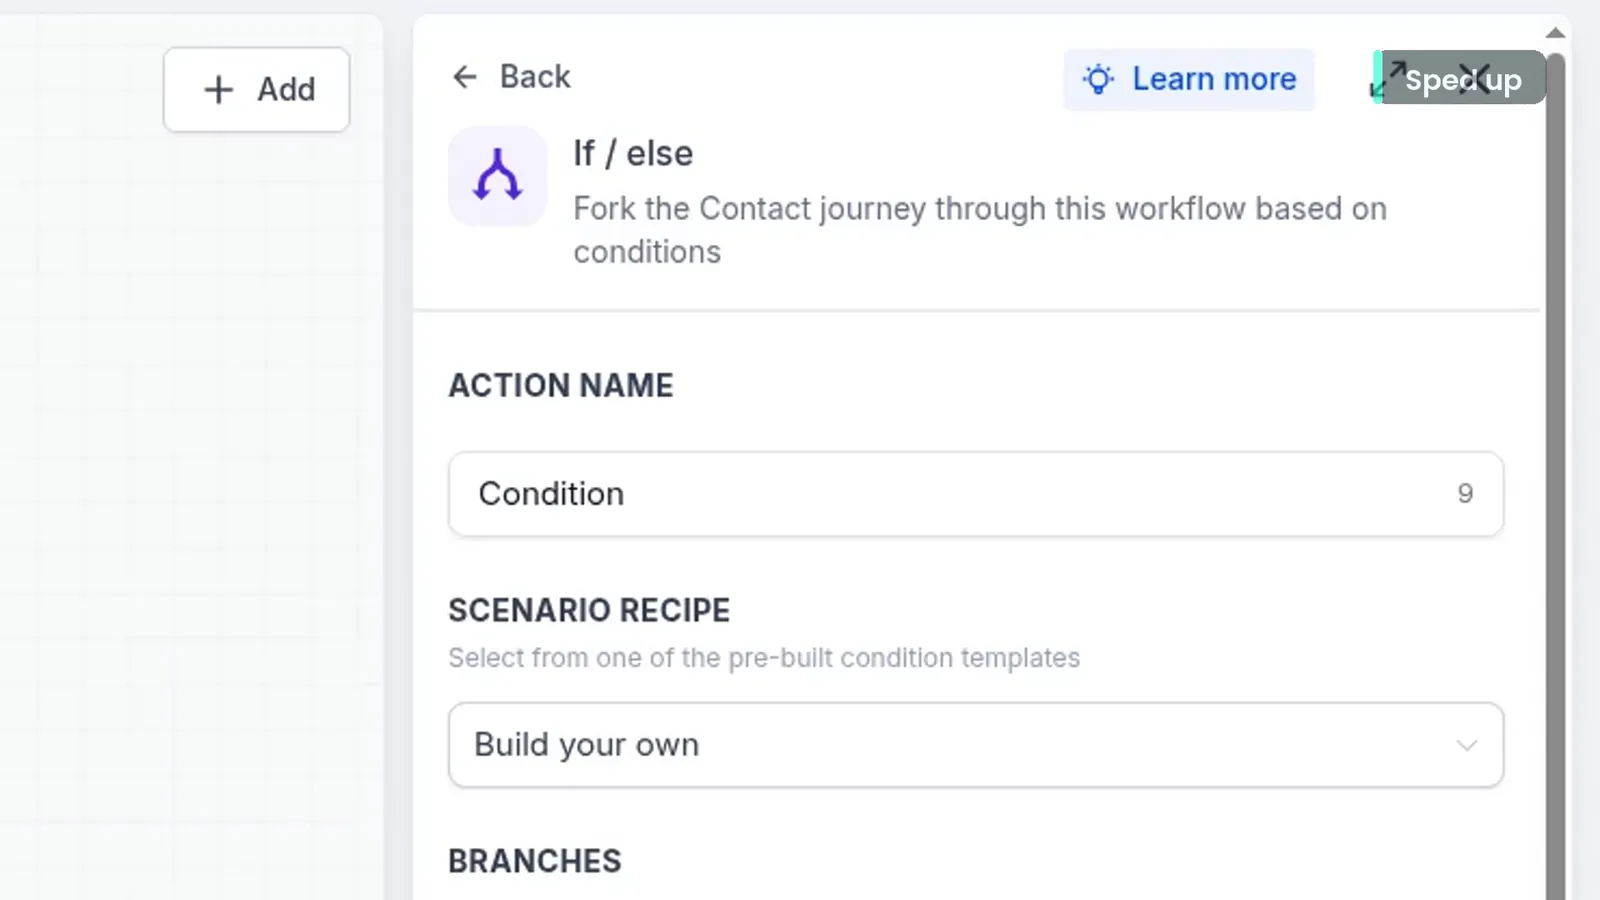
If/Else sends the contact down the first branch that matches. Anyone who matches nothing goes down None.
On None, there's no phone number, so a call task makes no sense. I add a note instead: No phone, email only. Then an Internal Notification, which is for your team, not the lead:
- Type: the list has Email, Notification, SMS and WhatsApp. I pick Notification, the one inside the app.
- Title: New lead needs email follow up.
- Message: Lead has no phone number. Follow up by email.
- Redirect page: Contact, so one click opens the lead.
- Send to: a particular user on the team.
Nothing goes out to the contact here. It just makes sure a real person on your team knows this lead needs a different kind of follow up.
Step 7: Check the workflow settings
Open the Settings tab. Most people skip this, and a lot of odd behaviour comes from here.
| Setting | What it does | What I chose |
|---|---|---|
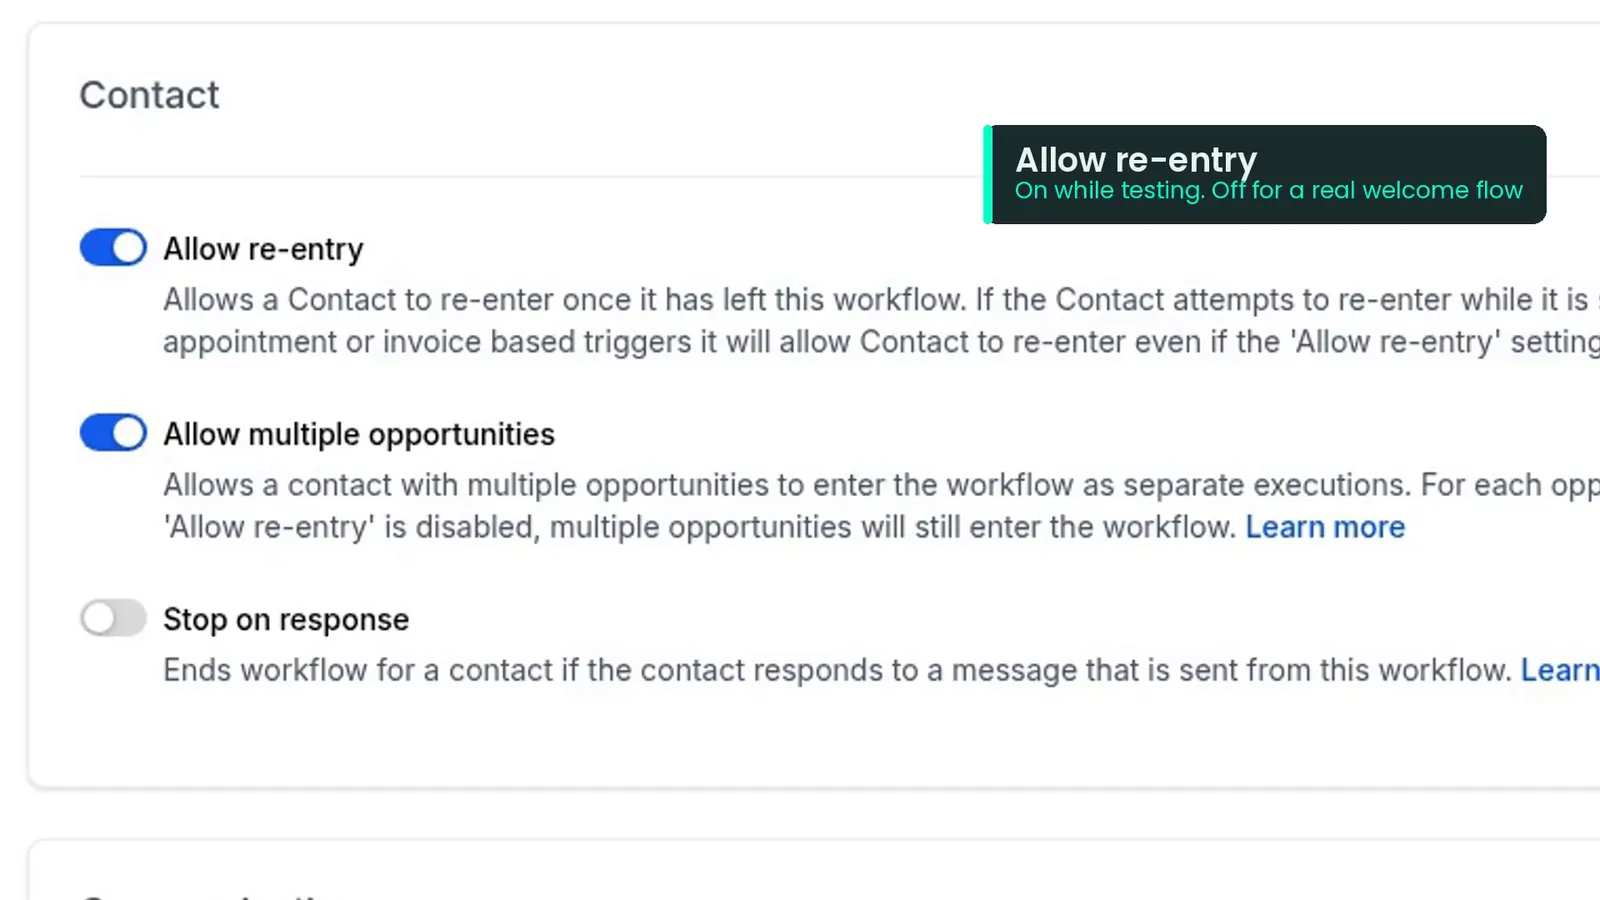
| Allow re-entry | Lets the same contact go through the workflow more than once | On while testing, because I run the same demo contact through again. For a real welcome workflow I'd usually turn it off. Nobody wants to be welcomed twice. |
| Allow multiple opportunities | If a contact has more than one opportunity, they can go through once for each | Left as it was |
| Stop on response | Ends the workflow for anyone who replies | Off, because the Wait step already handles replies |
| Timezone and time window | With the time window on, steps only run in the hours you pick | Account timezone, time window off. Switching it on is kinder than a text at midnight. |
| Sender details | From name, from email and from number | Empty, to use the account defaults |
HighLevel explains each of these in its workflow settings overview.
Step 8: Add a goal event
This is where the advanced part starts. Picture this: a lead books an appointment while they're sitting in that one day wait. They shouldn't have to sit there. A goal lets them jump ahead.
- At the top of the Has phone path, add Goal Event.
- The goal types include an email event, a trigger link click, a tag added or removed, and appointment status. Pick appointment status.
- Pick your calendar. Mine is a test calendar.
- The status options are new, confirmed and showed. I choose confirmed.
- For anyone who reaches this step without hitting the goal, pick continue anyway.
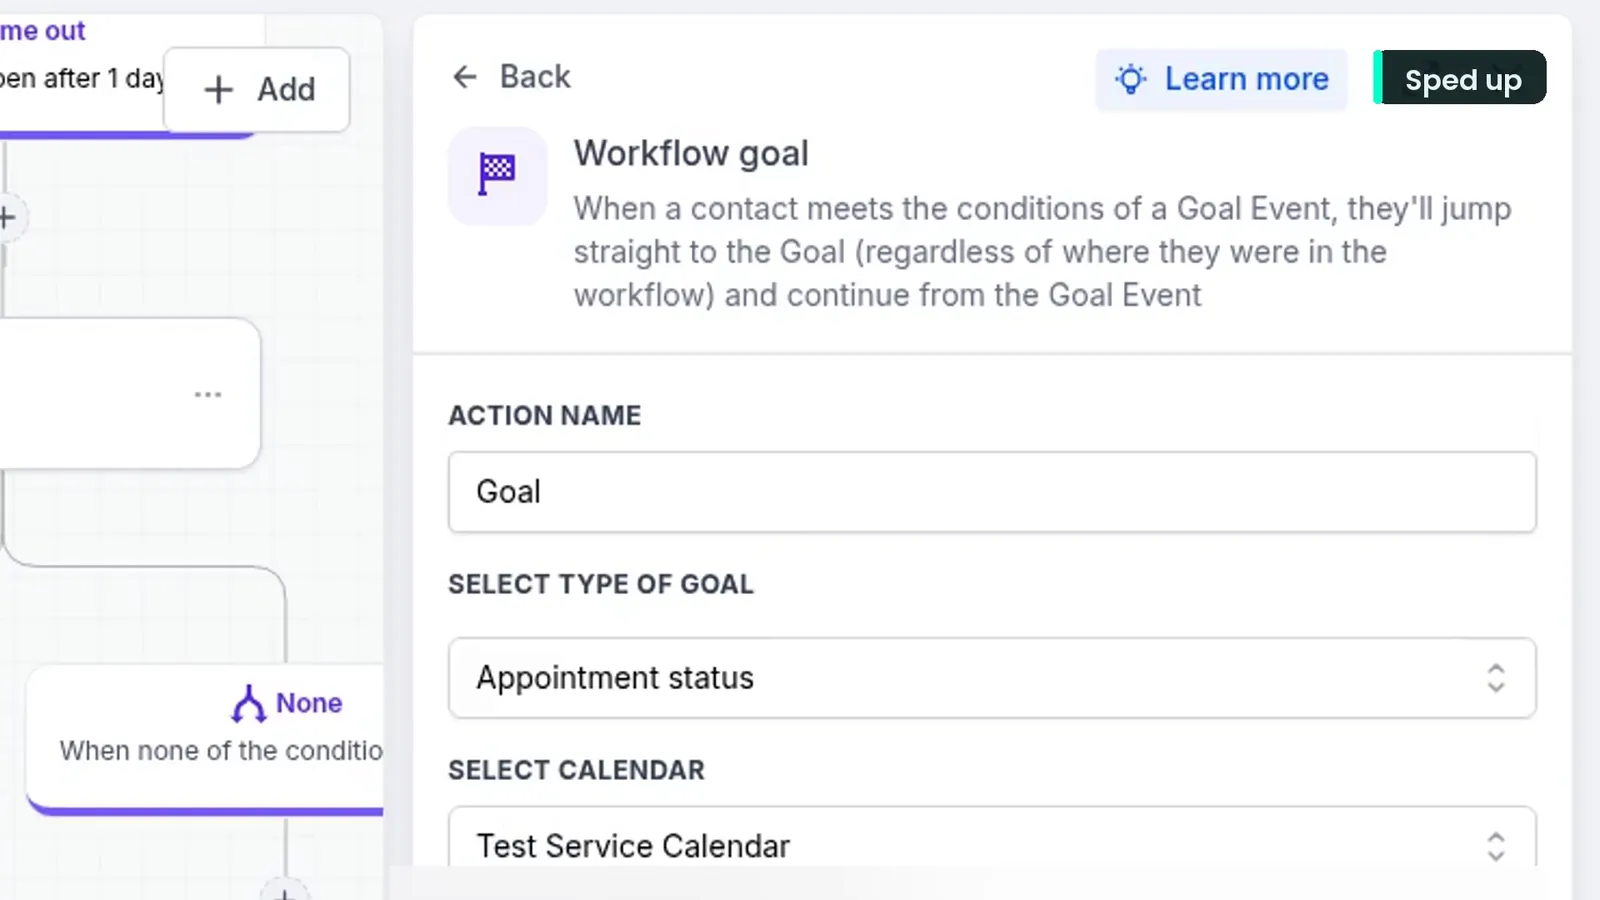
So the moment an appointment is confirmed, wherever that contact is in the workflow, they jump straight to this point. HighLevel's Goal Event help article lists every goal type.
One honest note about this build: the goal sits above the Loop, so a confirmed lead still carries on into the call tasks below it. If you want confirmed leads to skip the calls completely, put the goal after the Loop instead. I left it where it is so you can see exactly how goals behave.
Step 9: Loop for numbered call tasks
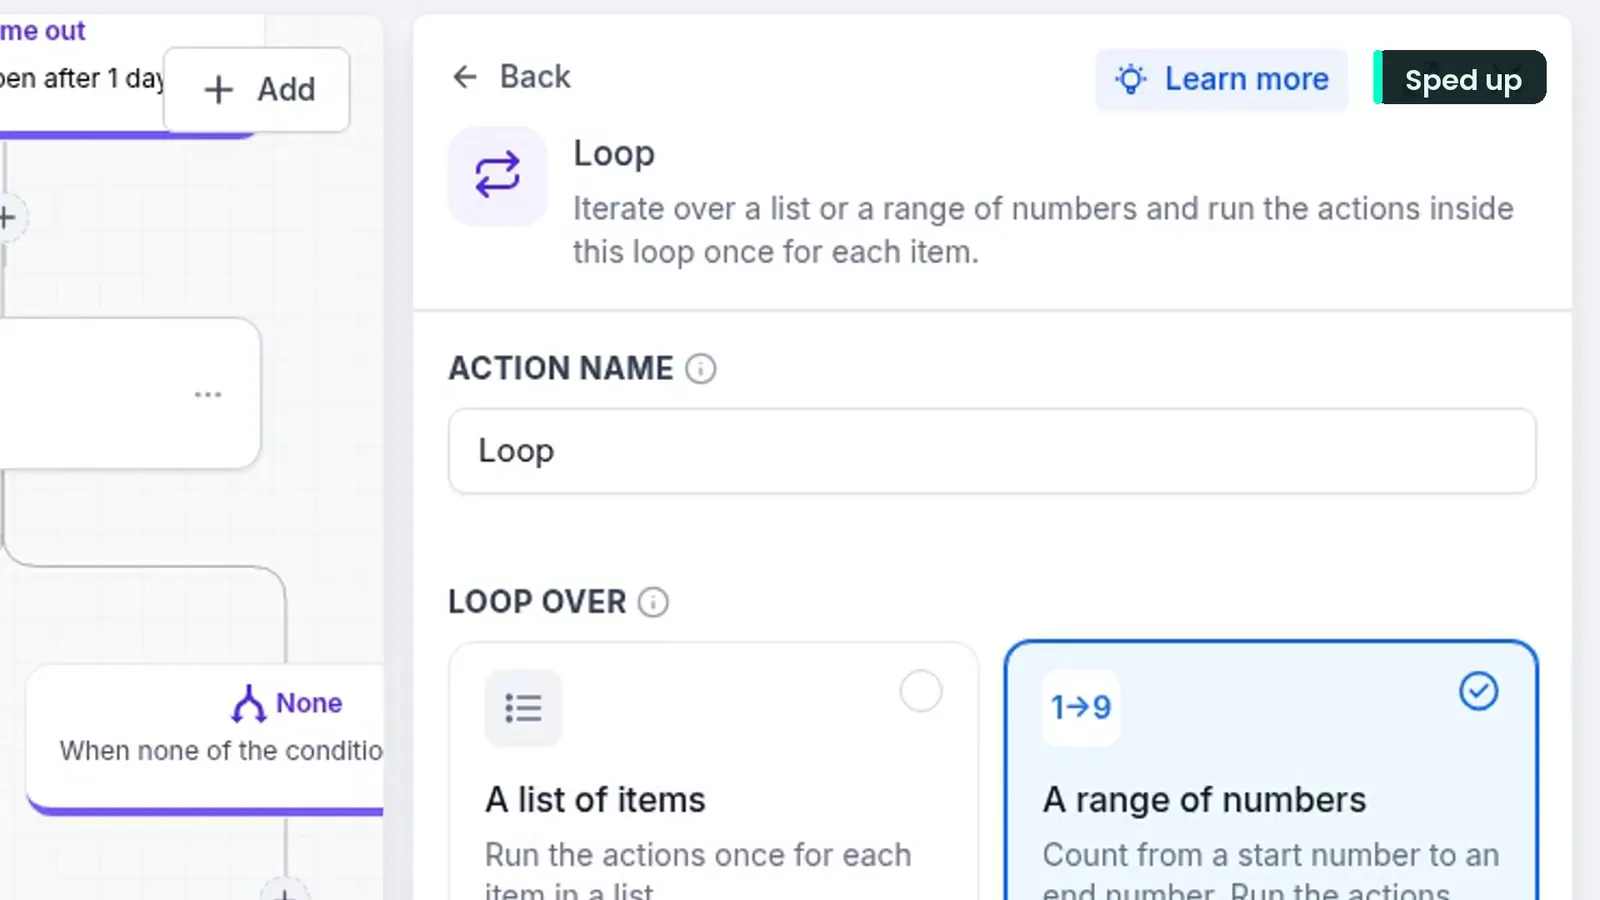
Next, the new Loop action. It had a Beta tag in my account. Loop repeats whatever you put inside it, once for each item in a list, or once for each number in a range.
Why use it here? Because one call task is easy to ignore. Three numbered attempts are much harder to lose track of.
- Under the goal, click the plus and pick Loop.
- Choose A range of numbers. It starts at 1 to 10. Set it to 1 to 3, and the panel tells you the actions inside will run three times.
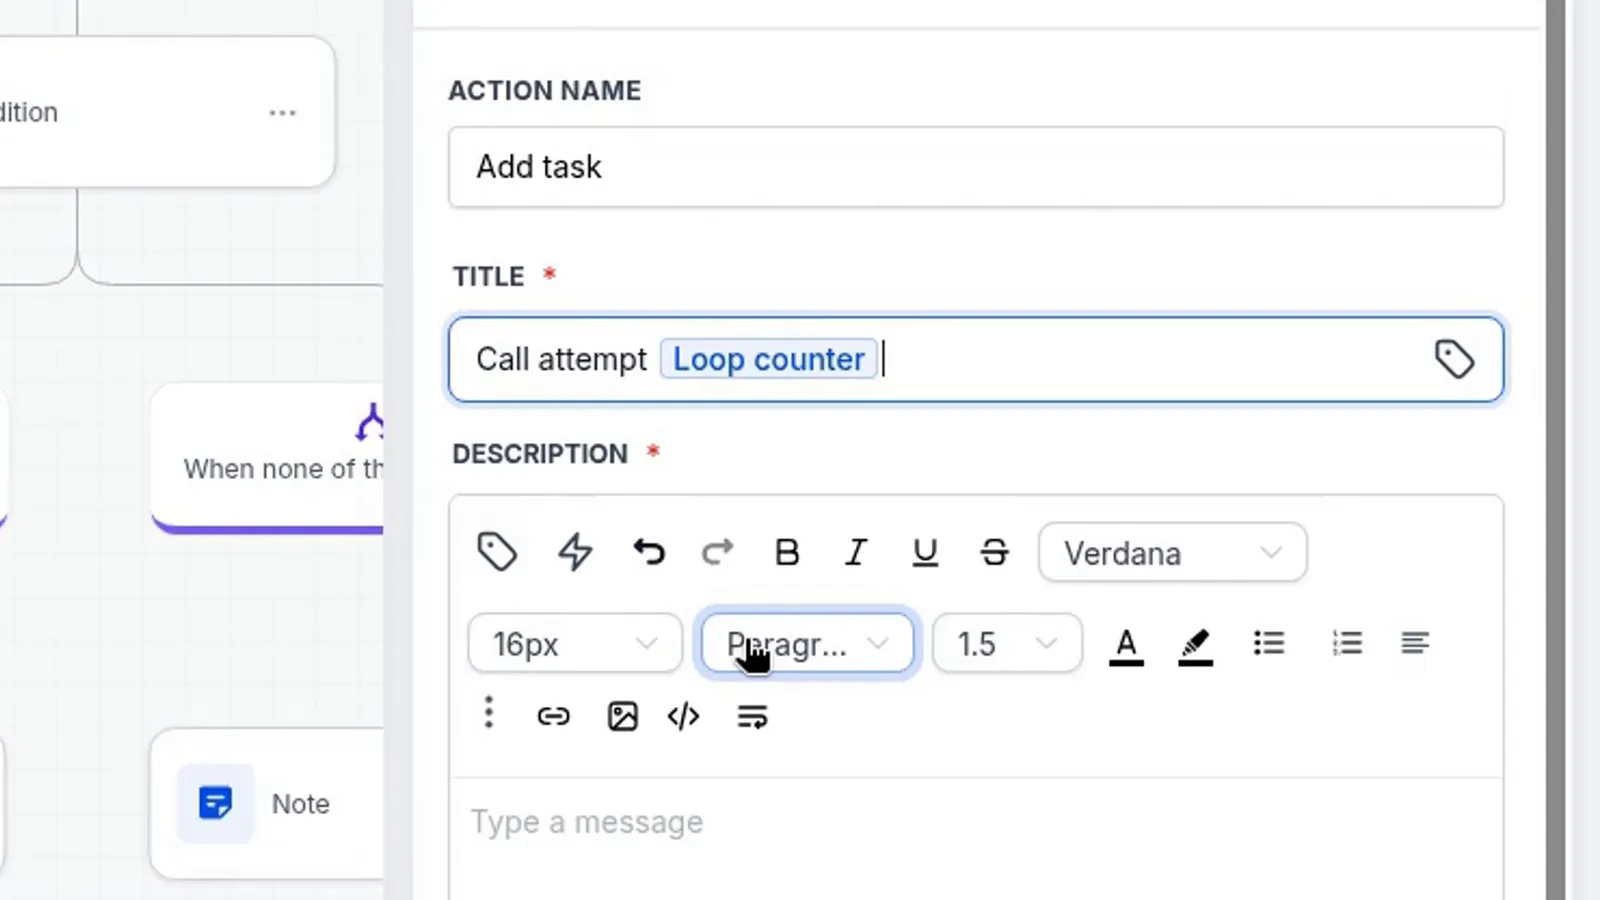
- Save, then click the plus inside the loop and add Add Task.
- For the title, type Call attempt, then add the Loop counter from custom values. That counter is what turns three identical tasks into attempt one, two and three.
- Description: Call the lead. Assign it to your team member, due in one day.
Only the steps inside the loop repeat. Anything after it runs once. For more on Loop, including list mode, see HighLevel's Loop release note and my post on Loop, Router and AI Agent Skills.
Step 10: Router for every branch that matches
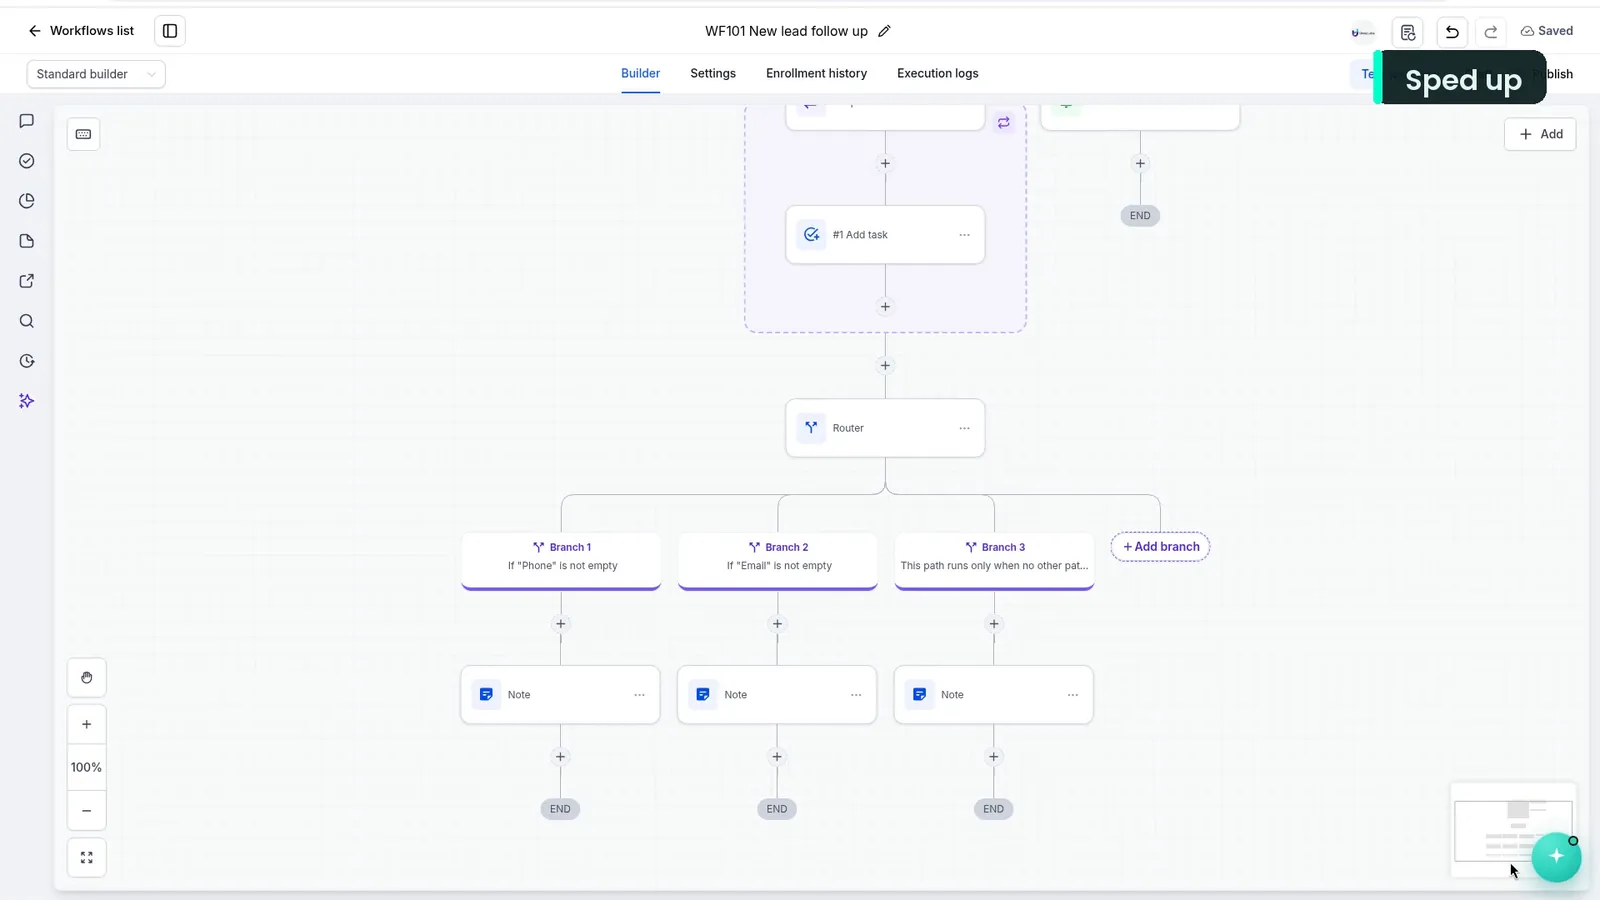
Now the new Router. At first glance it looks like If/Else, but there's one big difference. If/Else stops at the first branch that matches. Router sends the contact down every branch that matches, one after another, left to right. That matters because real leads often tick more than one box.
- Under the loop, click the plus and search Router. You'll spot an OpenRouter app in the results too, so make sure you pick the Router action.
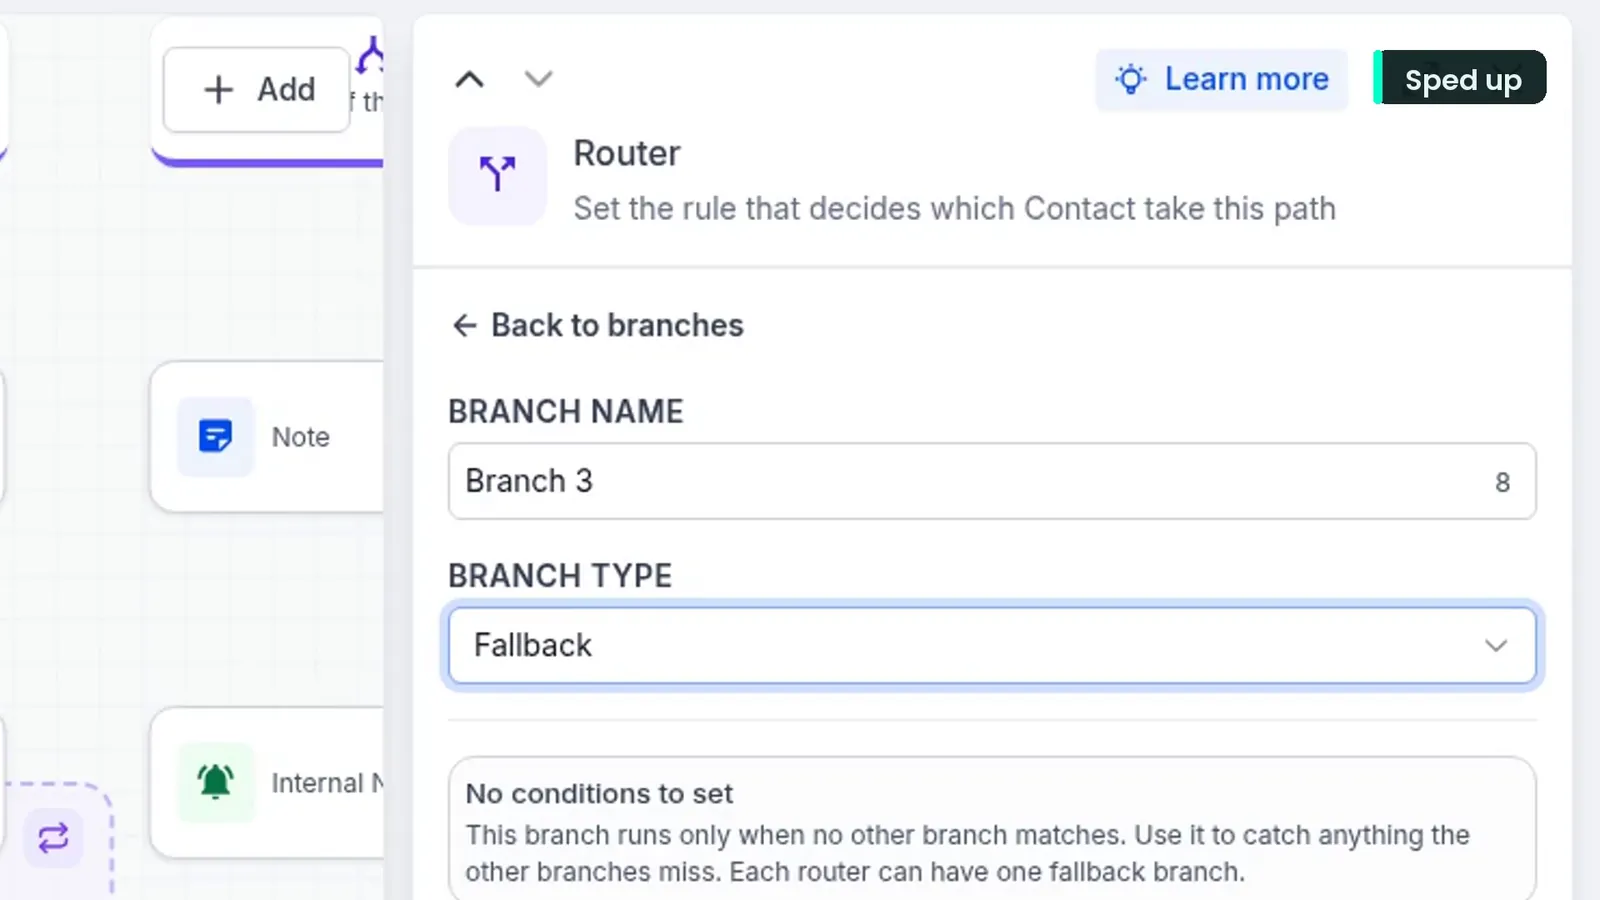
- Each branch has a type: Custom rules, Always run or Fallback.
- Branch one, custom rules: Phone is not empty, with a note, Call first.
- Branch two, custom rules: Email is not empty, with a note, Email follow up.
- A Fallback branch, with a note, No contact details. It only runs when nothing else matches, and each router gets one.
If/Else or Router: which one to use
| If/Else | Router | |
|---|---|---|
| Branches that run | Only the first branch that matches | Every branch that matches, left to right |
| When nothing matches | The None branch | The Fallback branch (one per router) |
| Use it when | A contact should take one path only | A contact can tick more than one box and every match needs its own steps |
HighLevel's Router release note has more examples.
Step 11: Build by chat with Workflow AI
You don't have to drag every step in by hand. Open Workflow AI inside the builder. There are two tabs, Build and Chat. I'm on Build, and I type:
After the Send Email step, add a note that says Welcome email sent.
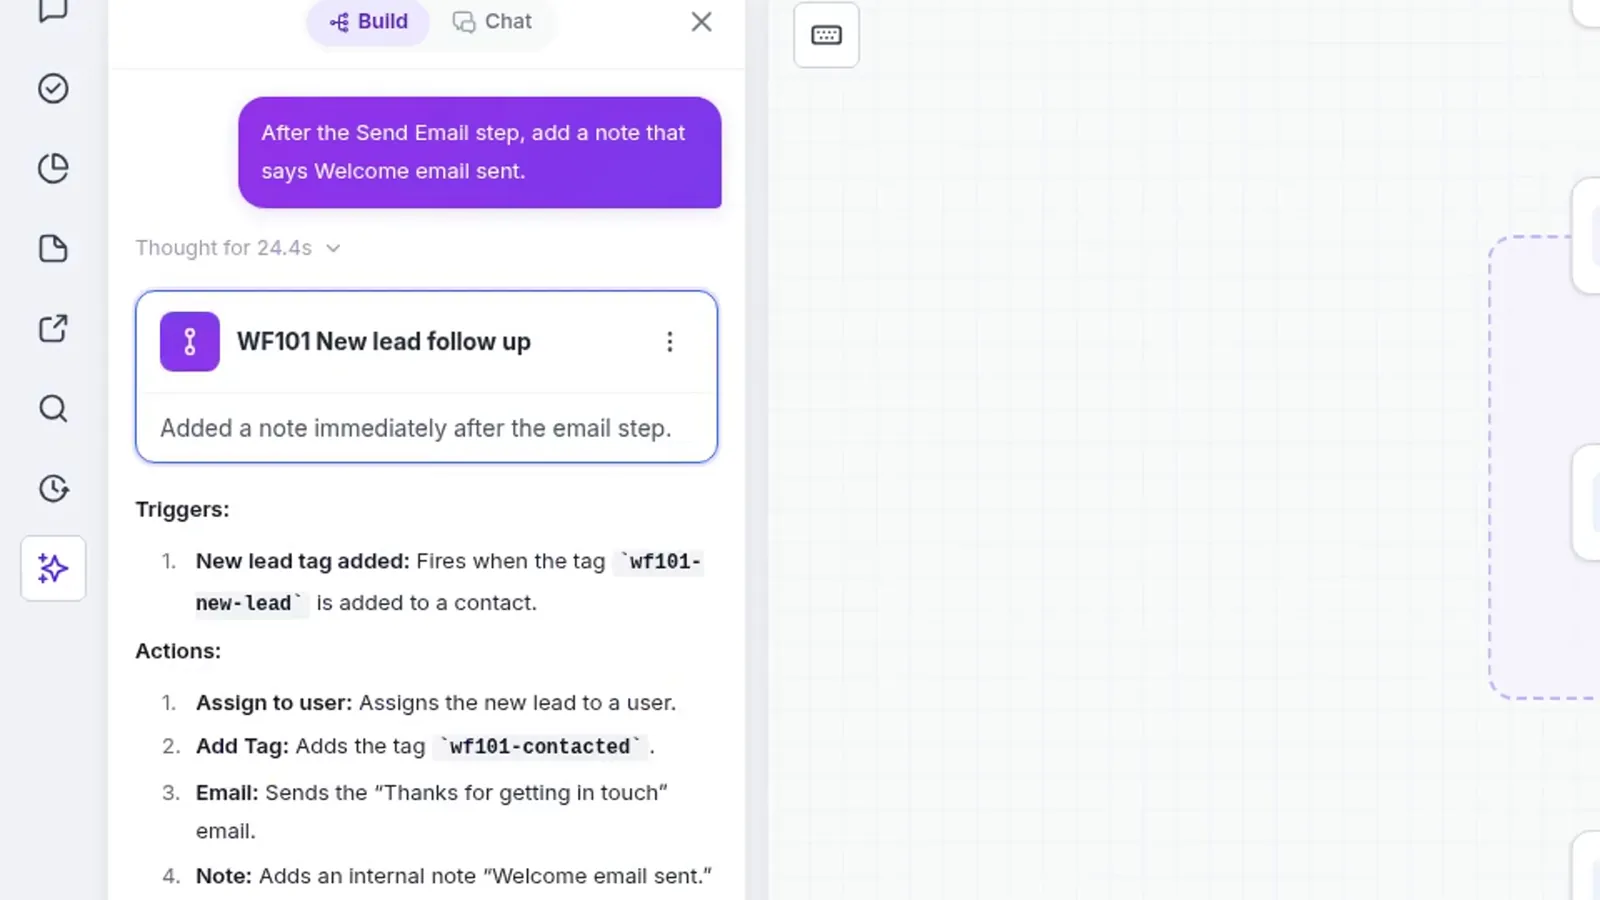
You can watch it work: understanding, planning, updating, checking. It thought for about 24 seconds, then added the note right after the email, between the email and the text. It also tells you what it changed and sums up the workflow.
Here's the habit I'd love you to keep: check its work, the same way you'd check anything AI wrote. Is it in the right place? Does it say what you asked? Here, yes and yes. HighLevel's Workflow AI Builder help article covers what else it can change, and my post on AI Builder using your account data shows a longer example.
Step 12: Test the workflow and read the logs
This is the step people rush, and the one that matters most.
- Click Test workflow, pick a contact and run it. I use one of my demo contacts.
- Open Execution logs. Here's every step that ran for that contact, with its status.
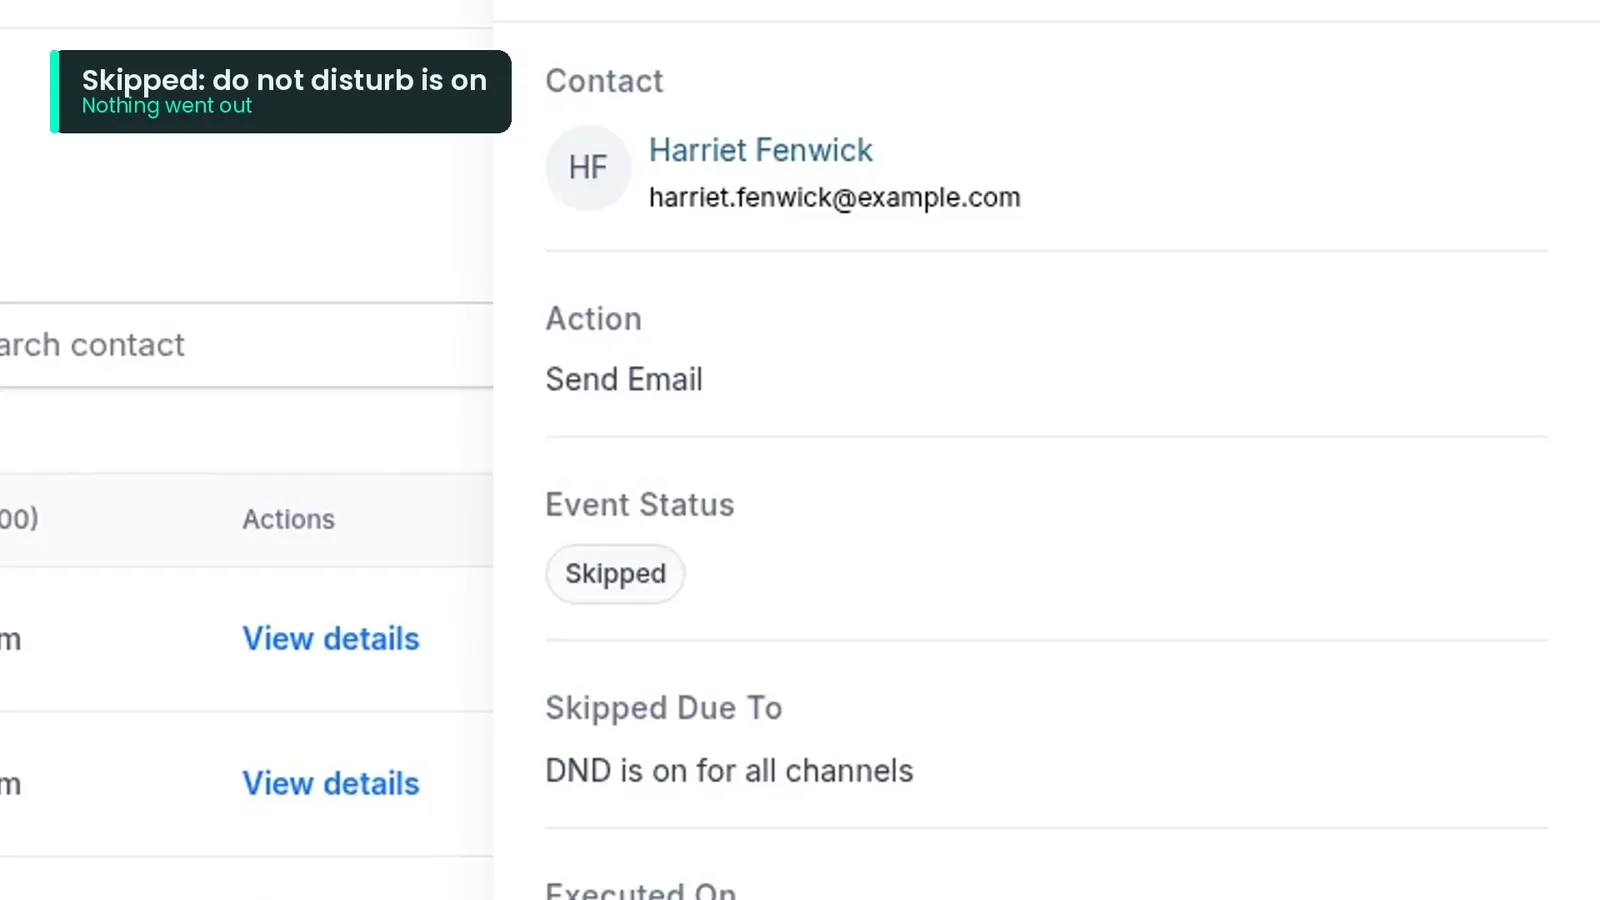
The email and the text both say skipped, because do not disturb is on for all channels. That's exactly what I want. Nothing went out to anyone. The wait says waiting: it's listening for a reply on email and SMS, with a one day timeout.
Shorten the wait to see the whole path
You don't want to wait a whole day to see the rest. So:
- Remove the demo contact from the workflow in Enrollment history.
- Change the wait timeout to one minute, just for testing.
- Run the test again.
A minute later, the logs show the whole path. The wait times out. Has phone is true, because the contact has a number. Then the goal. Then the loop, with iteration one, two and three. Then the Router: branch one and branch two both ran, because the contact has a phone and an email. With If/Else, they'd only have got the first one. The fallback didn't run, because other branches matched. At the end, the contact is removed by end of workflow.
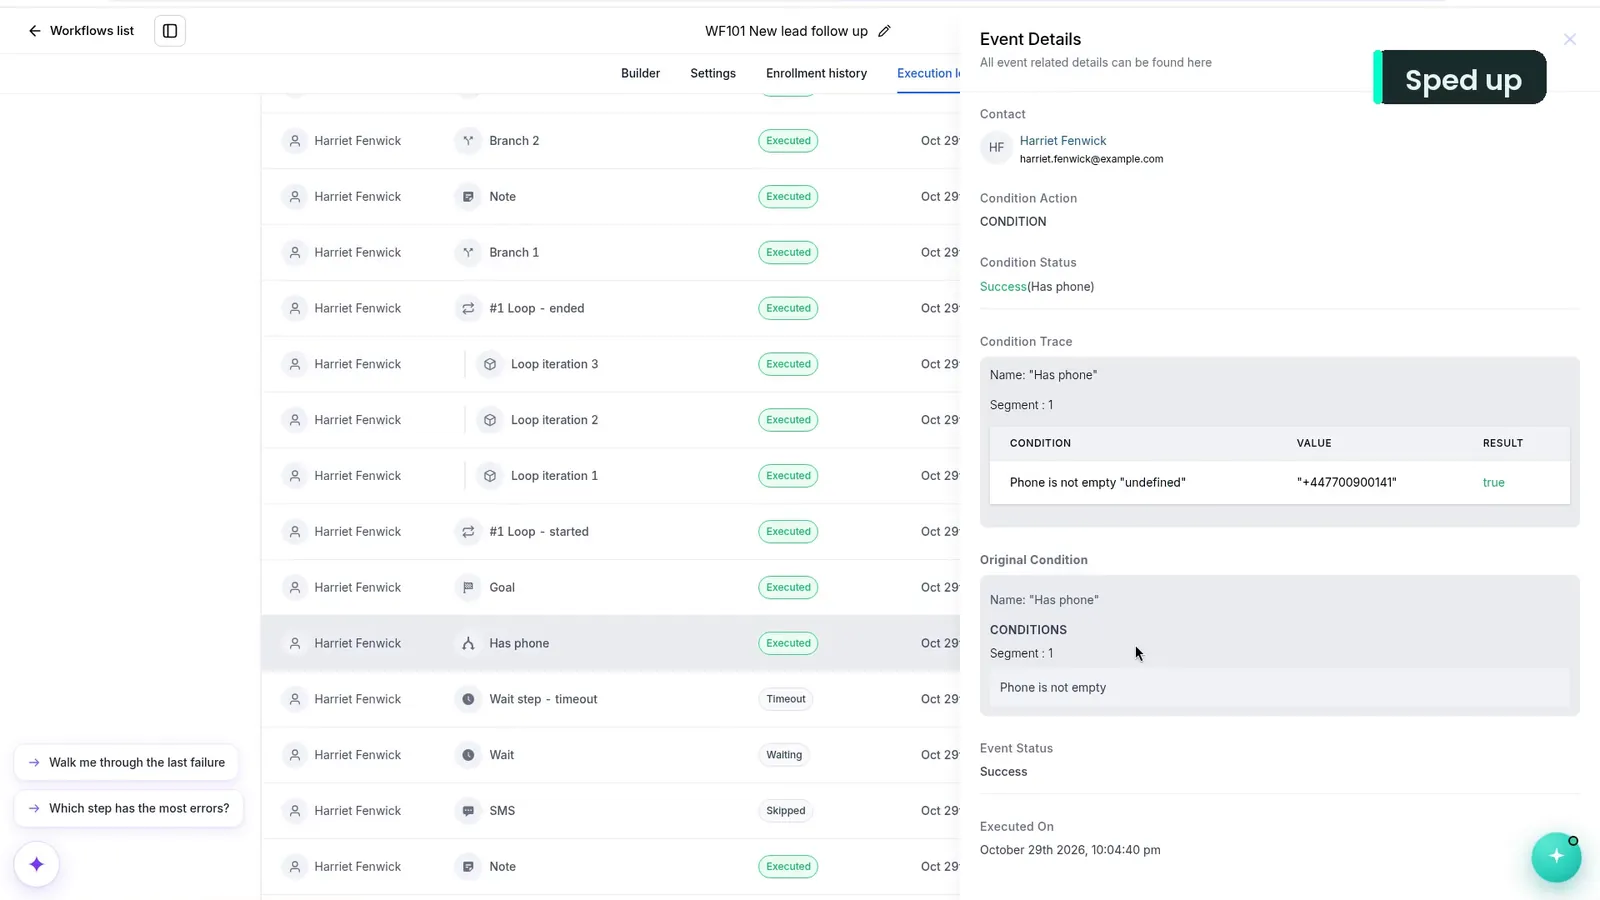
The condition trace shows exactly why a contact went down a branch, so when something goes the wrong way, start there. On the contact's page you'll find the notes Call first, Email follow up and Welcome email sent, plus three tasks, Call attempt 1, 2 and 3, all assigned and due the next day.
Two warnings. A test runs the real steps. Those tasks and notes are really there now, so only test on your own contact or a demo one. And put the wait back to one day when you're done. A one minute timeout left in a live workflow would chase people far too fast.
If you want to test straight from the AI chat instead, see my post on Test workflow inside AI Builder.
Checklist before you publish
Here's the whole build again: a trigger with a filter; assign, tag, email and text; a wait for a reply; If/Else for leads with no phone; a goal for confirmed appointments; then the Loop and the Router. Before you publish your own, check three things:
- The trigger has a filter, so it only fires for the tag you meant.
- Your settings are right, especially re-entry.
- You've tested on a contact you own, read the logs, and put any test timeouts back.
Then switch it from draft to publish. Mine stays a draft. Once you've got a few workflows running, my free Workflow Clean-up Checklist helps you keep them tidy.
Beginner mistakes to avoid
- A trigger with no filter. It fires for every tag added to every contact.
- Saving an AI draft without reading it. In my test the text ended with a "your name" placeholder.
- Leaving re-entry on for a welcome workflow. Nobody wants to be welcomed twice.
- Using If/Else when a lead can match more than one branch. If/Else only runs the first match. Use Router.
- Leaving a test timeout in place. A one minute wait in a live workflow chases people far too fast.
- Testing on real leads. Tests run the real steps. Use your own contact or demo contacts with do not disturb on.
Where to go next
For a deeper look at the new actions, read GoHighLevel Loop, Router and AI Agent Skills. When workflows get bigger, my Workflow Maps guide covers finding errors, and my Workflows API and MCP guide shows how to ask Claude what broke in a workflow. If you want Claude working inside your account, start with connecting Claude to HighLevel's official MCP server.
Not on HighLevel yet? You can sign up through my HighLevel link.
Affiliate disclosure: this is my affiliate link, so I may earn a commission if you sign up, at no extra cost to you.
Frequently Asked Questions
What are the three parts of a GoHighLevel workflow?
Why does my GoHighLevel workflow fire for every contact?
What is the difference between If/Else and Router in GoHighLevel?
What does the Loop action do in GoHighLevel workflows?
How do I test a GoHighLevel workflow without messaging real people?
Does a draft workflow run for anyone?
Want your GoHighLevel workflows built and tested properly?
I build GoHighLevel workflows, AI agents and automations for agencies and service businesses, and I test them on demo contacts before anything goes live. Email me at urooj.shafat292@gmail.com or use the contact form.
Sources
- My video: GoHighLevel Workflows Tutorial 2026 (Beginner to Advanced) (Code With Urooj, 2 November 2026)
- HighLevel Help: Getting started with workflows
- HighLevel Help: Workflow action, Wait
- HighLevel Help: Workflow settings overview
- HighLevel Help: Goal Event workflow action
- HighLevel Help: Workflow AI Builder
- HighLevel Changelog: Loop, new workflow action
- HighLevel Changelog: Router, new workflow action